Two CakePHP behaviours to extend MeioUpload

I’ve been using the the Meio Upload Behaviour for a while as its a very handy piece of code, but as is so often the case it doesn’t do quite what I need. In the past I’ve got round this by hacking together a kind of supporting framework in app_controller and scattered about in my models. But the other day I came across the newest version of the code by Juan Basso on Github and decided to dump my mess of spaghetti code and start from scratch.

Aims

The idea is that each model can have its own uploads with their own defaults, for example:

  • Products might need to generate images at 3 different sizes with the smallest zoom cropped.
  • News items might have 2 image sizes but also need to upload a PDF press release.

All of the uploaded files can be viewed and managed centrally from the Upload model.

The changes I wanted to make were as follows:

  1. Use a single Uploads table attached to multiple models (using the Polymorphic behaviour)
  2. The ability to do multiple uploads at once
  3. Rename my uploaded files
  4. Have an UploadVariants model / table with meta information about the thumbnails
  5. Be able to use more of the PHPThumb image options and use them on a per thumbnail basis.

Rather than just take the behaviour and start writing on top of it, I decided to extend the original behaviour (yes you can do this in CakePHP – its just easy to get absorbed in the framework and forget it) and then create an additional behaviour that manages the multiple uploads.

The underlying requirements are quite simple:

(Note 09/07/2009 you don’t actually need the Polymorphic Behaviour, unless you want to do fancy things with your finds)

And my two new behaviours:

At the end of the article is a link to let you download a zipped working CakePHP app with everything in place

The models

First things first. The database tables on which my models are based.

/*
MySQL Backup
Source Host:           localhost
Source Server Version: 5.0.51b-community-nt
Source Database:       je_meio
Date:                  2009/06/29 15:39:15
*/

SET FOREIGN_KEY_CHECKS=0;
#----------------------------
# Table structure for products
#----------------------------
drop table if exists products;
CREATE TABLE `products` (
  `id` int(11) NOT NULL auto_increment,
  `title` varchar(255) default NULL,
  `created` datetime default NULL,
  `modified` datetime default NULL,
  `created_by` int(11) default NULL,
  `modified_by` int(11) default NULL,
  `created_name` varchar(255) default NULL,
  `modified_name` varchar(255) default NULL,
  PRIMARY KEY  (`id`)
) ENGINE=MyISAM AUTO_INCREMENT=1 DEFAULT CHARSET=utf8;

#----------------------------
# Table structure for upload_variants
#----------------------------
drop table if exists upload_variants;
CREATE TABLE `upload_variants` (
  `id` int(11) NOT NULL auto_increment,
  `upload_id` int(11) default NULL,
  `variant` varchar(255) default NULL,
  `filename` varchar(255) default NULL,
  `quick_type` varchar(50) default NULL,
  `width` int(4) default NULL,
  `height` int(4) default NULL,
  `created` datetime default NULL,
  `modified` datetime default NULL,
  `created_by` int(11) default NULL,
  `modified_by` int(11) default NULL,
  `created_name` varchar(255) default NULL,
  `modified_name` varchar(255) default NULL,
  PRIMARY KEY  (`id`)
) ENGINE=MyISAM AUTO_INCREMENT=1 DEFAULT CHARSET=utf8;

#----------------------------
# Table structure for uploads
#----------------------------
drop table if exists uploads;
CREATE TABLE `uploads` (
  `id` int(8) unsigned NOT NULL auto_increment,
  `class` varchar(255) default 'Upload',
  `foreign_id` int(11) default NULL,
  `alt` varchar(255) default NULL,
  `filename` varchar(255) default NULL,
  `dir` varchar(255) default NULL,
  `mimetype` varchar(255) default NULL,
  `quick_type` varchar(50) default NULL,
  `filesize` int(11) unsigned default NULL,
  `position` int(11) default '0',
  `height` int(11) default NULL,
  `width` int(11) default NULL,
  `created` datetime default NULL,
  `processed` tinyint(1) default '0',
  `modified` datetime default NULL,
  `created_by` int(11) default NULL,
  `modified_by` int(11) default NULL,
  `created_name` varchar(255) default NULL,
  `modified_name` varchar(255) default NULL,
  PRIMARY KEY  (`id`),
  KEY `class` (`class`,`foreign_id`)
) ENGINE=MyISAM AUTO_INCREMENT=1 DEFAULT CHARSET=utf8;
 class Upload extends AppModel {

  var $name = 'Upload';

  //The Associations below have been created with all possible keys, those that are not needed can be removed
  var $hasMany = array(
    'UploadVariant' => array(
      'className' => 'UploadVariant',
      'foreignKey' => 'upload_id',
      'dependent' => true,
      'conditions' => '',
      'fields' => '',
      'order' => '',
      'limit' => '',
      'offset' => '',
      'exclusive' => '',
      'finderQuery' => '',
      'counterQuery' => ''
    )
  );
  
  var $actsAs = array(
    'Polymorphic',
     'JeMeioUpload' => array(
         'filename' => array(
          'dir' => 'files/uploads',
           'create_directory' => true,
           'max_size' => 2097152,
           'max_dimension' => 'w',
           'thumbnailQuality' => 90,
           'useImageMagick' => false,
           'imageMagickPath' => '/usr/bin/convert',
           'allowed_mime' => array( 'image/gif', 'image/jpeg', 'image/pjpeg', 'image/png'),
           'allowed_ext' => array('.jpg', '.jpeg', '.png', '.gif'),
           'thumbsizes' => array(
             'small'  => array('width' => 90, 'height' => 90),
             'medium' => array('width' => 220, 'height' => 220),
             'large'  => array('width' => 800, 'height' => 600)
           ),
           'default_class' => 'Upload',
           'random_filename' => true
         )
       )
     );

}

In the Upload model, just include the Polymorphic behaviour and JeMeioUpload instead of MeioUpload. You could actually use the same defaults as the MeioUpload behaviour itself but there are two additional defaults ‘default_class’ => ‘Upload’, and ‘random_filename’ => true. These both refer to renaming files. As the behaviour can be used to manage uploads from multiple models in a single table it allows you to set the default Upload model. You can also set whether or not you want the files to have the meaningful part replaced with a random string.

class UploadVariant extends AppModel {

  var $name = 'UploadVariant';

  //The Associations below have been created with all possible keys, those that are not needed can be removed
  var $belongsTo = array(
    'Upload' => array(
      'className' => 'Upload',
      'foreignKey' => 'upload_id',
      'conditions' => '',
      'fields' => '',
      'order' => ''
    )
  );

}

The UploadVariant Model is just as it was baked.

class Product extends AppModel {

  var $name = 'Product';
  
  var $validate = array(
    'title' => array('notempty')
  );

  var $hasMany = array(
        'Upload' => array(
            'className' => 'Upload',    
            'foreignKey' => 'foreign_id',
            'conditions' => array('Upload.class' => 'Product'),
            'dependent' => true,
      'order' => 'Upload.position ASC'
        ),
        
    );
    
    var $actsAs = array(
     'JeMeioUploadPolymorphic'
   );


   var $jeMeioUploadParams = array(
      'filename' => array(
        'dir' => 'files/uploads/',
        'create_directory' => true,
        'allowed_mime' => array('image/jpeg', 'image/pjpeg', 'image/png', 'image/gif'),
        'allowed_ext' => array('.jpg', '.jpeg', '.png', '.gif'),
        'thumbsizes' => array(
          'small'  => array('width'=>60, 'height'=>60, 'image_options' => array('zc' => 1)),
           'large'  => array('width'=>800, 'height'=>400, 'image_options' => array('zc' => 0)),
           'shop'  => array('width'=>265, 'height'=>265, 'image_options' => array('zc' => 0))
        ),
        'random_filename' => false
      )
    );

}

Product is a test model set up to demonstrate the multiple uploads and the Polymorphic association to the Upload model. In this case the meaningful part of the filenames will not be replaced with a random string and the ‘small’ thumbnail will be zoom cropped. To find out more about image_options you will need to check the PHPThumb component and the documentation PHPThumb itself (play about and experiment) – what you can and can’t do will also be effected by whether or not you have ImageMagick on your server.

The Controllers

You don’t need to make any changes to your controllers at all.

The Views

There is nothing complicated in the views at all. Just remember to set them up properly for uploads.

The uploads/add.ctp

create('Upload', array('type' => 'file'));?>
	
input('alt'); echo $form->input('filename', array('type' => 'file')); ?>
end('Submit');?>

The products/add.ctp

This view allows up to 3 uploads to be stored in the associated Upload model.

create('Product', array('type' => 'file'));?>
	
input('title'); echo $form->input('Upload.0.filename', array('type' => 'file')); echo $form->input('Upload.1.filename', array('type' => 'file')); echo $form->input('Upload.3.filename', array('type' => 'file')); ?>
end('Submit');?>

Summary

The one part I’m not terribly happy with at the moment is error messages returning to the views in the Polymorphic associations (e.g. Product example). At the moment if an image or upload can’t be processed then there is no warning or error message. At the moment this is compromise I’m willing to live with.

I could certainly build some kind of component scaffold or something to go in the controllers to return an error message but I think the gain in responsiveness would probably be outweighed by the added complexity. Right now I can’t figure out an elegant way to get error messages from back to the views – if anybody has any suggestions please let me know.
(Note if you are uploading straight into the Upload model then the error messages are unaffected)

There is also the problem of what do you do when in a situation like the following: If you add a new Product successfully but the associated upload has problems? Ideally you would want to redirect to the edit view for that Product but there seems to be no easy way of doing this from a Model / Behaviour.

One solution that I have implemented in the past is to create dedicated views for uploading – so if you do hack your hacks are easy to manage.

I’ve baked a quick and dirty demo that you can download here. Its so basic that it doesn’t even show the uploaded images!

Todo List

  • A helper to generate things like uploads fields complete with delete checkboxes and thumbnail images.
  • Deleting the via the Polymorphic association (don’t think this works right now)

Multiple CMS systems with Symbolic Links

If you are a web developer you will very often be in the situation where you have to manage a server that has a large number of websites running on it all of which are running the same Content Management System. So far so good, everything is in one place and you know how your server is setup.

But what happens when you find a bug in the CMS system or you need to upgrade all the sites? You probably have a simple proceedure in place that goes something like this:

  1. Update & Test the development copy of the website.
  2. Copy the website to a file server into a new directory (named by date or version).
  3. Upload the files from the file server to the live web server.

The idea being that you always have an exact copy of the files on your live server on a local server, and that you can easily revert to an seralier version should you have to.

(This is assuming you aren’t using a CVS system, just a well organised file system and some good procedures.)

If you only have a couple of websites this isn’t a problem, but if you have 20 or 60 then suddenly you can end up having to deal with a lot of operations. If you host on a Linux server the solution to your problems is called a Symbolic Link. When I think of Symbolic Links I think of Alice in Wonderland and magic tunnels.

Wikipedia describes Symbolic Links like this:

In computing, a symbolic link (often shortened to symlink and also known as a soft link) consists of a special type of file that serves as a reference to another file or directory. Unix-like operating systems in particular often feature symbolic links.

Unlike a hard link, a symbolic link does not point directly to data, but merely contains a symbolic path which an operating system uses to identify a hard link (or another symbolic link). Thus, when a user removes a symbolic link, the file to which it pointed remains unaffected. (In contrast, the removal of a hard link will result in the removal of the file if that file has no other hard links.) Systems can use symbolic links to refer to files even on other mounted file systems. The term orphan refers to a symbolic link whose target does not exist.

Symbolic links operate transparently, which means that their implementation remains invisible to applications. When a program opens, reads, or writes a symbolic link, the operating system will automatically redirect the relevant action to the target of the symlink. However, functions do exist to detect symbolic links so that applications may find and manipulate them.

Users should pay careful attention to the maintenance of symbolic links. Unlike hard links, if the target of a symbolic link is removed, the data vanishes and all links to it become orphans. Conversely, removing a symbolic link has no effect on its target.

Personally I don’t find this very helpful – what it means in practice however is that you can have create what appears to be a directory, but the contents of that directory are stored somewhere completely different. Even better you can create lots of these directories each of which appears unique, but which in fact all point to the same data.

Why have 60 copies of the same identical data and update it 60 times when instead you can update the source data once?

Example

Symbolic Links

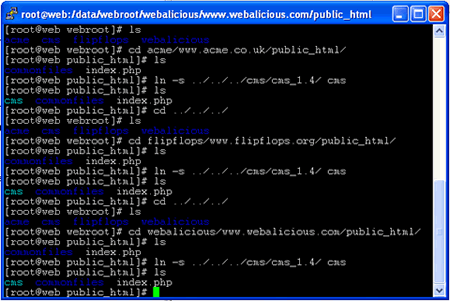
This is screenshot of a Linux directory listing illustrating the symbolically linked directories all pointing to the same files. To update all the CMS systems all you would need to do is update a single directory. This is a very simplified view of course, to run a system like this in real life each website needs its own configuration file(s) etc.

Looking at the file system via FTP you see this:

FTP screenshot

How to create a Symbolic Link

To create a symbolic link you need access to the command prompt – this will usually be via SSH. I use a small program called putty to do this.

The command is: ln -s source_file myfile where source_file is the file or directory you wish to link to and myfile is the name of the symbolic link you wish to create.

This screenshot shows the commands I use to create the symbolic links in the other examples:

Screenshot of putty in action

Getting Bake to Work

A really powerful feature of CakePHP is bake –  a script located at  /cake/scripts/bake.php – it is similar in function to the Ruby on Rails Scaffold application – it is a command line programme that can generate outline or scaffolding code to carry out simple CRUD operations, based solely on your database structure.

I have had quite a few problems getting Bake to work reliably, but persevere because it is worth it. I have been developing on a PC running XP Pro and Apache2Triad 2.0.55

On windows there seems to be a bit of an issue with paths and in order to do any baking on an existing project you need to specify the full paths.

[I use the Command Window Here  Power Toy for Win XP which makes it easy to get the command prompt to the right place.]

To create a new cake application

  1. Navigate to \cake\scripts\ and open the command prompt.
  2. php bake.php -app name_of_application
  3. follow the onscreen instructions…

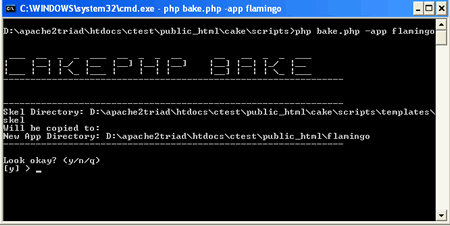
For Example: To create a new application called Flamingo:

php bake.php -app flamingo

bake

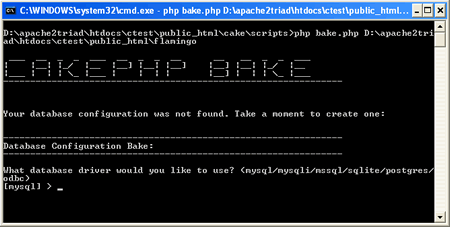
As you can see bake asks you if its ok to create a skeleton application on the path specified.

How to bake inside an existing application

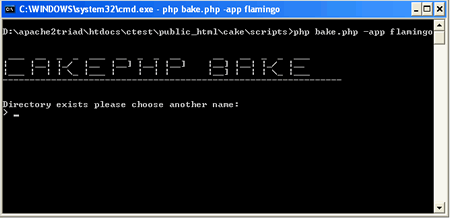
If you want to bake inside an existing application, from the Cake tutorials and articles, it appears that you should be able to just type: php bake.php -app flamingo again, unfortunately this doesn’t work. Instead you get the following message.

how not to bake

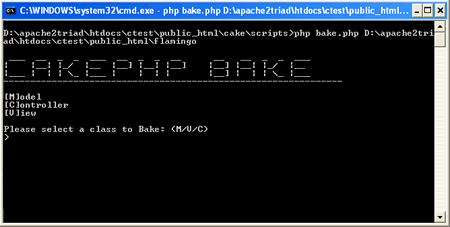
What you actually need to type is something that includes the full path to your new cake application, something like:

php bake.php -app D:\apache2triad\htdocs\ctest\public_html\flamingo

If you already have a database structure you will see something like this:

Let’s bake

If you don’t yet have a database setup you will be prompted for connection details like this:

bake - no database

Happy Baking

A to Z links with CakePHP

On a lot of websites, especially directories or those which contain large amounts of alphabetical data you see A to Z lists. You know the idea, click on a A and see every entry beginning with A, click on B… etc.A to Z screenshot

then…

A to Z list

Well, here is how to do it with Cake (a new PHP application development framework). It isn’t at all hard.

First some prerequisites:

  1. A working cake setup.
  2. A simple model storing some data in the corresponding database table – in our case called Gallery.

CREATE TABLE `gallery` (

`id` int( 10 ) unsigned NOT NULL AUTO_INCREMENT ,
`title` varchar( 50 ) default NULL ,
`body` text,
`created` datetime default NULL ,
`modified` datetime default NULL ,
PRIMARY KEY ( `id` )

)

Step 1 – edit the gallery controller

You need to a new function to your gallery controller in order to show the A to Z link list. It should look something like this:

function show($str = null ) {  if(!$str)   

   {   

    $this->set('str','');   

   }   

  else   

   {   

    $this->Gallery->recursive = 0;   

    $this->set('galleries', $this->Gallery-> 
                     findAll("LEFT(title, 1) = '$str'"));   

    $this->set('str',$str);   

   }   


 }

Step 2 – create the view

You now need to create a view for this action, your view will should be called show.thtml and should be created in app\views\galleries. This is pretty simple – the only thing to take note of is right at the top – renderElement – rather than put the code to write the A to Z list directly in the view, I’ve decided to create it in an element. This means that it can be reused in any view within the site.

The first parameter ‘atoz‘ is the name of the element which in this case will be called atoz.thtml the second parameter is an array containing the varibales that will be available to the element – url is the action we want the links to point to, str is the value of str we selected e.g. b

<?php   

   echo $this->renderElement('atoz', array('url' => 
'/galleries/show/', 'str' => $str));   

?>
<?php
if(!empty($str))   

 {
?>   

<table cellpadding="0" cellspacing="0">
<?php foreach ($galleries as $gallery): ?>   

<tr>   


 <td><?php echo $gallery['Gallery']['title']; ?></td>   

 <td><?php echo $gallery['Gallery']['body']; ?></td>   


 <td nowrap>   

  <?php echo $html->link('View', 
      '/galleries/view/' . $gallery['Gallery']['id'])?>   

 </td>   

</tr>   

<?php endforeach; ?>   

</table>   

<?php
 }
?>
 

Step 3 – create the element

<?php
 $alphabet = array('a','b','c','d','e','f','g','h','i','j', 
'k','l','m','n','o','p','q','r','s','t','u','v','w','x','y','z'); 
  
 echo('<ul class="atozlist">'); 
 $i = 1; 
 foreach($alphabet as $link) 
  { 
   $class = ''; 
   if($i == 1) 
    { 
     $class = ' class="firstitem" '; 
     $i++; 
    } 
     
   if(strtolower($str) == $link) 
    { 
      echo('<li ' . $class . '> 
           <span class="thisitem">' . $link . '</span></li>'); 
    } 
   else 
    { 
     echo('<li ' . $class . '><a href="' . $url . $link . '">
        ' . $link . '</a></li>'); 
    } 
  } 
 echo('</ul>'); 
?>